If you’ve ever entertained the idea of moving abroad, teaching English in Spain is a good way to do it. NALCAP is an option that has a relatively low barrier to entry.
What is NALCAP?
The North American Language & Culture Assistant Program (NALCAP) is a Spanish government program. It brings native-like English speakers to Spain to assist English teachers in public schools. Participants (also called auxiliares de conversación, or auxiliars for short) help students with their English and provide cultural exchange.
Teaching English in Spain, or elsewhere, is one of the best ways to get a feel for life in a new country. I didn’t want to live in Spain permanently, but just for a while. For me and many others, the NALCAP program is the best way to do that.
How does NALCAP work?
Auxiliars typically work from October 1-May 31 for 12-16 hours a week. The assignments include health insurance and a stipend between 700-1000 euros depending on the region. (Keep reading for some living costs based on my experience in Alicante, in the Valencian Community.)
This schedule allows plenty of free time to travel and/or work on the side for extra money. Plus, auxiliars get the typical school breaks of summer, winter holidays, and spring break. Many choose to do in-person private tutoring on the side or teach online with companies like Varsity Tutors and Cambly. If you have non-teaching remote gigs available to you, those are good options. Just remember that with a student visa you are not legally allowed to work for Spanish employers.
When your school year in the program is coming to an end, you have the option of renewing for another year. During this process, you can request to stay in your same school and/or region, or move to a different assignment.

Who should apply to NALCAP?
This is the perfect option for people who want to move overseas, but need to get a foot in the door as far as employment and initial residency status. It’s also great for people who just want the experience of living in another country and traveling more. And if your goal is to make teaching your career, you can add this experience to your resume.
For me, I knew I wouldn’t enjoy a teaching career and didn’t plan to pursue that. But I deeply wanted to travel more, especially coming out of pandemic lockdown. I got to travel a lot within Spain (Barcelona, Valencia, Marbella, Málaga, Granada, Mallorca, and more), to other countries nearby (Portugal, Germany, Italy, and Morocco), and practice my fading Spanish skills. I also used my year in the program to study coding online so I could make a career switch when it was over.
What if you’re not in your twenties?
Most NALCAP participants are in their twenties, often recent college graduates. But there are auxiliars of all ages. I turned 36 during my NALCAP year and there were others who were older, some living in Spain with their spouses. So, if you’re not in your twenties don’t feel like you can’t apply. Anyone between 18 and 60 years old is eligible.
How should you prepare to apply?
First, make sure you’re eligible for the program. To be eligible, you must:
- Be a native-like English speaker
- Be a U.S. citizen and have a valid passport (Other nationalities can apply, but I’ll focus only on the process for U.S. citizens since that’s the process I went through. Here is the NALCAP Canada website.)
- Have a bachelor’s degree or be currently enrolled as a sophomore, junior, or senior in a bachelor’s program, have an associate degree or be a community college student in their last semester
- Be in good physical and mental health (Which doesn’t mean you must have no physical or mental health conditions – I’ll speak more on this later.)
- Have a clean background check
- Be aged 18 – 60. Age ranges have to do with labor regulations in Spain.
Optional experience to include
Though not required, some things can strengthen your application. Think about whether you have any:
- Travel or intercultural experience
- Spanish language skills, even at a basic level
- Teaching or tutoring experience, either paid or unpaid
- Experience working with children, teaching or otherwise
During college, I briefly volunteered at a community center teaching English to Latin American migrants. Even though that was over a decade ago, I made sure to include it. Nothing is too small, as long as it’s relevant. Just to be extra sure I’d be accepted, I earned a TEFL certification online from TEFL.org. It cost money of course, but it was a pretty easy process.
There was plenty of intercultural experience I could include. I started learning Spanish in middle school and continued studying it through college, eventually studying abroad in Peru.
What if you have zero relevant experience?
If you have none of this experience, I recommend starting to get it before you send in your application. Volunteer at a local immigration center, sign up to be an English conversation partner on Cambly, travel if money and time allows, or take an online course. There are a lot of things that can be done, even in a short amount of time, to strengthen your application.

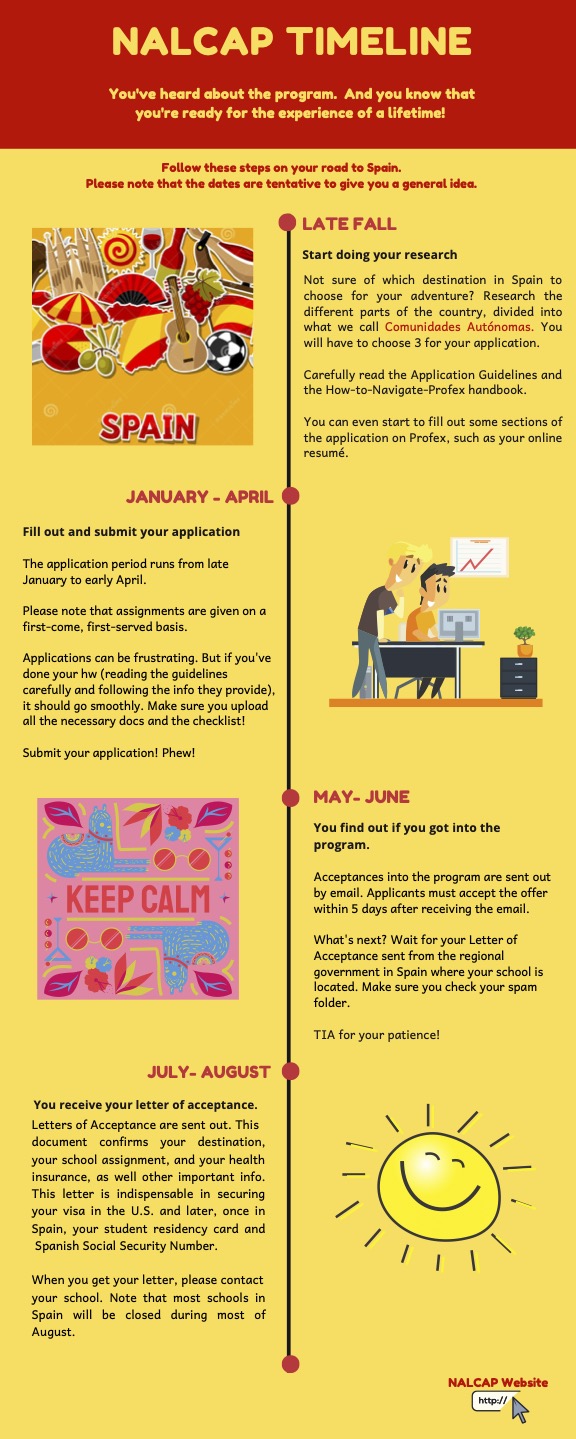
What is the NALCAP application process?
The NALCAP application period runs from late January to early April. The following information applies to first-time applicants, so if you’re renewing make sure to do some specific research.
The application is submitted through an online portal. The process can be a bit difficult because the platform isn’t very user friendly and it’s all in Spanish. But instructions are provided in English in a PDF handbook that you can find here, along with other application guidelines.
Note: Your passport number is used as your portal username, so if you need to apply for or renew your passport, do that well before applications open.
Required documents
Here are the documents you’ll need to submit through the portal:
- One recommendation letter (Refer to letter guidelines here.)
- A signed statement of purpose about why you want to participate in the program (250-300 words)
- A copy of your valid passport photo page
- An official university transcript or copy of diploma
Other application questions
You’ll also have to fill out a resume/CV section, an application form, select your preferred student age level (primary or secondary school), and select your top three choices for the region you want to be assigned. You’re not guaranteed your first choice, but you’re more likely to get it if you submit your application right when the application window opens.
Choosing your top three regions
Some things to consider are whether you want to live in/close to a big city or in a smaller town, cost of living, access to the ocean, and regional languages. As usual, cost of living is higher in big cities like Madrid and Barcelona. Public transportation and fun things like nightlife and food options will be limited in smaller towns.
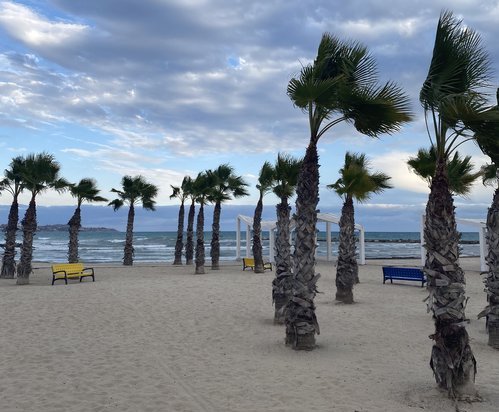
My first choice was the Valencian Community and that’s where I ended up. My school was in a small town called Novelda, but I chose to live in Alicante, the closest city. I commuted to school by bus and sometimes, by catching a ride with a teacher who happened to live in Alicante or another auxiliar who had a car and was assigned to the same school.
Note: The Valencian Community is notorious for paying auxiliars late for the first 1-2 months. There is an entire handbook created by auxiliars to try to address this problem and have it fixed. Despite this, I don’t regret choosing the Valencian Community, but make sure you have enough money in the bank for emergencies like this.
Choosing your school level preference
Primary school is for students ages 6 – 12 and secondary school covers ages 12 – 18. If you want primary school, you will be doing a lot of art projects, songs, and games since these very young students don’t have much grasp of English. In secondary school, you’ll be able to use more English teaching skills if you have them. There will also be a lot less crying, vomiting, and bodily fluids in general.
Behavioral problems can happen at any level, but it’s the teacher’s responsibility to discipline students. Beyond telling the students to quiet down or stop doing something, it’s not your job to control the class.
What happens after I’m accepted?
If you’re accepted, you’ll get an email saying your status is now ADMITIDA. That means you’ll soon receive a regional placement. Once you receive your placement, you have three days to accept. Your regional placement can’t be changed – you either accept it or decline participation in the program altogether.
Letter of Acceptance and beginning the visa process
Now that you’ve accepted, be ready for a bunch of paperwork and possibly some headaches. Only after April 15th, request a background check for your visa application. During this time, you’ll be waiting to receive your letter of acceptance, or carta de nombramiento. This letter states your exact school assignment with contact details, your stipend amount, and other important details.
Make sure to print out a few copies of this letter and keep a digital copy. You’ll need it for your visa application, your residency card once you arrive in Spain, and possibly other things like proof of employment when finding an apartment.
Contacting your school
The letter says to contact your school immediately after receiving the letter, using the email address provided. Based on stories from other auxiliars, there is a wide variety of responses from schools. Some auxiliars had experiences where the school never responded and didn’t even know who they were when they showed up for the first day of work. Other schools kept in regular contact with the auxiliar and were organized and engaged. Just like many other aspects of living in Spain, your experience heavily depends on the individual person/people you happen to be dealing with.
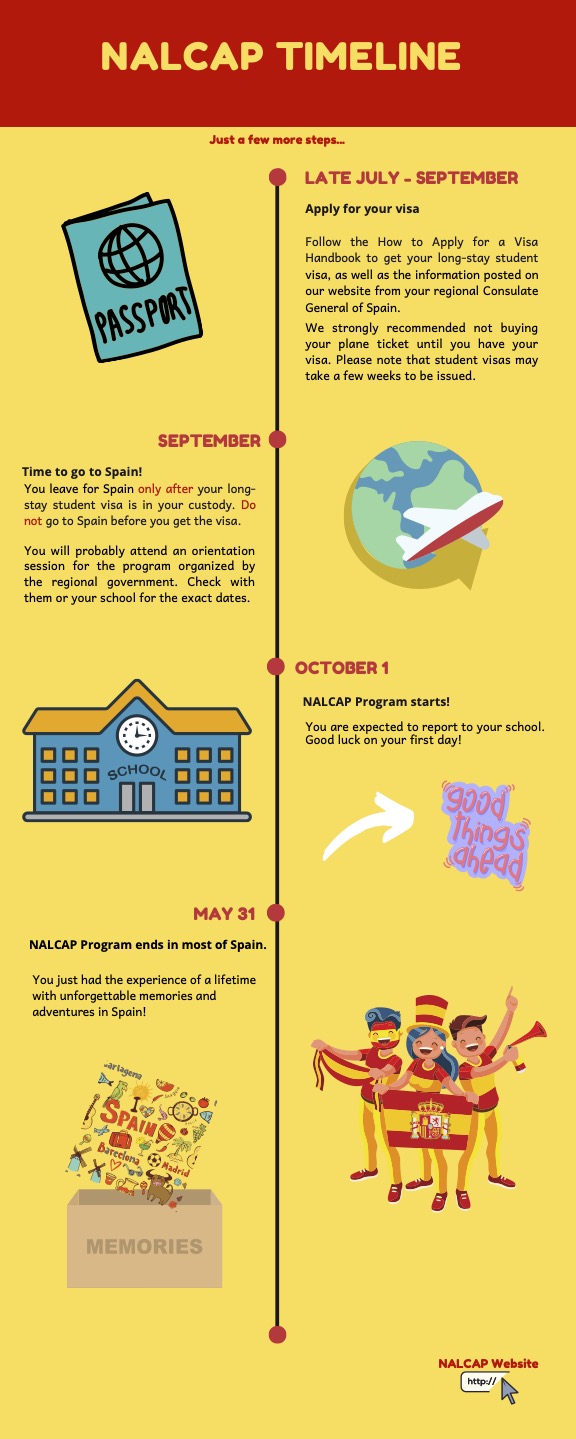
Now that you have your letter of acceptance, you can begin the visa application process.
Applying for a visa
For dual U.S. – EU citizens
If you have dual U.S. – EU citizenship, you don’t have to apply for a visa. You will need two extra documents, though – a background check and a medical letter stating you have no drug addiction, are in good mental and physical condition, and have no limitations that would impair your ability to function in a classroom. You’ll bring these to your first day of school. I don’t remember seeing this information when I applied, so it might be new. It would have saved me a lot of time if I’d known!
For only U.S. citizens
Even though auxiliars are working, not studying, NALCAP participants have to apply for a student visa. You need to have your visa in hand before you travel to Spain, so don’t buy a plane ticket yet unless you’re willing to change the flight date if necessary.
The Consulates General of Spain in the United States handle visas, so you’ll want to check your consulate’s website for up-to-date requirements. At the bottom of this page, you can find links to the different consulates and choose the correct one for your area. The following is what my consulate in Washington, DC required.
Generally, the student visa application requires:
- Visa application form
- Passport-size photo (Can be done quickly in many drug stores, UPS stores, etc.)
- Original and copy of valid passport (Must be valid for at least the duration of your stay in Spain and have two blank pages.)
- Letter of acceptance
- Proof of financial means (The letter of acceptance meets this requirement.)
- Proof of health insurance (The letter of acceptance meets this requirement.)
- Criminal background check
- Medical certificate issued no more than 90 days before you submit your visa application (I simply emailed this recommended template to my doctor and asked them to put it on letterhead and sign it.)
- Proof of residence in the consular district (i.e. driver’s license, student ID)
- For minors: parent or guardian authorization and proof of representative’s identity and capacity
- Visa fee of $160 for U.S. citizens/$90 for non-U.S. citizens (Cash or money order)
For any non-Spanish documents, you’re required to provide a Spanish translation and authentication by the Apostille of The Hague. You also want to check whether there’s any requirement around mailing in your application or applying in-person. Possibly due to the pandemic, I had to mail everything in by certified mail with a stamped, self-addressed return envelope and hope my passport wouldn’t get lost.
How long does it take to receive your visa?
Turnaround time varies, but I received mine from the Washington, DC consulate in about three weeks. However, I heard stories from auxiliars (mostly from the Los Angeles consulate) who still hadn’t received their visa after the official start of their school year. They just had to keep waiting and start their assignment whenever they were able to arrive in Spain.
Since you don’t know exactly when your visa will arrive, start the process as early as possible. You can’t apply too early because some documents have to be issued within a certain time frame and you have to wait for your letter of acceptance. But you also don’t want to apply too late because it can delay your arrival in Spain.
When thinking about when you’d like to arrive in Spain, factor in enough time to find an apartment, apply for your residency card, figure out transportation, and other everyday basics. I’ll go into more detail on that now.
Connect with other auxiliars
It’s important and useful to connect with other auxiliars virtually. Other auxiliars, especially those who have been in the program for more than one year and are assigned to your region, are a great source of information. There are Facebook groups for different regions, as well as one for all language assistants in Spain.
You can also join WhatsApp groups that auxiliars have created. I was in a group for everyone in the Alicante province, and then other smaller groups splintered off from there. I joined groups specifically for social meetups, for 30+ year old auxiliars, for buying and selling items, for hiking meetups, etc. You can usually find links to join in the Facebook groups.

What to do once you’ve arrived in Spain
If you thought the visa process was stressful, it’s not over yet. It actually gets more stressful, especially if you don’t speak Spanish. But you’ll get through it! Here are next steps once you land in Spain.
Getting your residency card/TIE
The student visa is only valid for 90 days. After this, you’ll need a Spanish residency card to be a legal resident. Get this asap, since you may need it to open a bank account where your stipend is deposited.
Key words and definitions
You’ll see these words a lot:
NIE: Número de identidad de extranjero, or foreign identity number. You should see this number on your visa and will need to use it often.
TIE: Tarjeta de identidad de extranjero, or foreign identity card. You need to make an appointment to receive this as soon as possible once in Spain.
Cita or cita previa: Appointment
Toma de huellas: This is the type of appointment you need when requesting your TIE. During the appointment, they take your fingerprints which is what the name means.
Overview of the TIE process
- Make an appointment with your local immigration office (Oficina de Extranjería) or police station to request a TIE (and NIE if it wasn’t on your visa). Appointments are made online. (Here’s the link for the Valencian Community.) It can take weeks just to get an appointment, so check the website literally every day to see if there are new time slots open. If your appointment ends up being during work hours, getting your TIE counts as an excused absence. You should not be penalized or lose pay for that time.
- Bring these documents (original and multiple copies) to your appointment:
- Appointment confirmation
- Visa
- Acceptance letter
- Passport
- Medical certificate that you got while still in the U.S.
- Background check, also from the U.S.
- Completed Form EX-17 (First two pages only, for non-EU citizens)
- Two passport photos (Accepted sizes are different from in the U.S. Stop into a photo shop, or use a photo booth that you might find outside the immigration office to get your photo taken with the correct specifications.)
- Paid tasa (fee). You need to first fill out the form called Tasa modelo 790 Código 012 online and print it out. Bring it to the bank and pay the fee or pay at an ATM. I easily paid mine at a Caixa Bank ATM. The fee was 16 euros in 2022.
- Certificado de empadronamiento. This certificate confirms that you reside in Spain. I never got mine and got lucky that they didn’t ask for it at my TIE appointment. But that wasn’t the case for others, so it’s best to have it to be safe. For this, you need to make an appointment at your local town hall. Since you need to bring the empadronamiento to your TIE appointment, you’ll want to make this appointment as soon as you can. Of course, you can only do this once you’ve found an apartment. To get the certificate you need to bring a few documents, as well. (Lease, passport, acceptance letter, a completed form, and copy of your landlord’s DNI, which is the ID card for Spanish citizens)
- If everything is accepted, you leave your appointment with a document that has a lote (batch) number. You can find unofficial websites that show the current lote number (here’s the website for Alicante) or call the office and ask. When your number shows, take your document and go back to the immigration office to pick up your TIE.
Getting a Spanish phone number
This is a quick but important step, so try to do it soon. It’s good, and sometimes required, to have a Spanish number when completing forms. All you need to do is stop into a phone service provider store. Vodafone, Movistar, and Orange are the most popular. Ask for a tarjeta prepago (prepaid SIM card) with however much data you want, then they’ll fill out a form for you. Now you have a Spanish phone number.
Another option is to use an eSIM, but that’s better for short-term travel because it doesn’t come with a phone number. If you want to go this route, at least at first, I recommend Airalo.
Finding an apartment
Where to look
Finding an apartment (a piso) can take a long time. Places to search include Idealista.com, Fotocasa.es, Roomgo.es, Badi.com, Facebook groups, and fellow auxiliars who are looking for roommates.
Some landlords won’t speak English well or at all. If you’re not a Spanish-speaker you may prefer to text with them on WhatsApp using Google Translate.
Expected costs and useful tips
Rent prices vary from place to place. I insisted on living alone, so I paid a bit more. My rent was 450 euros for a furnished two-bedroom, plus utilities. If you opt for roommates, you could pay as low as the 200-euro range. Here are some useful things to know about living in Spain:
- Your apartment will most likely not have a dryer. Most people in Spain line dry their laundry, but you can also go to a laundromat.
- Many places don’t have heating, even though I was surprised to find how cold it got inside during the winter. I had to buy a portable heater.
- Most residences use butane gas. You’ll have to buy gas bottles, called bombonas, and pick up or request delivery of a new one once it’s used up. See this article for more details. You shouldn’t have to worry about getting a contract because the landlord should have that already.
- Spain has tons of discount shops called bazars, typically run by Asian owners. These are great places to buy cheap home goods. Don’t expect top quality every time, but for things like dishes, utensils, home tools, and bedsheets, it’s not necessary to spend a lot especially if you don’t plan to stay in your city long-term.
Opening a bank account
Mobile banks
Opening a bank account can be complicated, so I chose the easier option of opening an N26 account. N26 is a mobile bank, so there are no physical locations. If you need to withdraw or deposit cash, you can go to the ATM of most physical banks across Europe to do it. I got a free standard account and ordered a debit card for a one-time 10-euro delivery fee. Highly recommend.
Traditional banks
If you prefer to open an account at a physical bank like Caixabank, Sabadell, Banco Santander, or BBVA, you have to make an appointment to do it in person.
The documents you’ll need to bring vary from bank to bank and even from employee to employee. (Hence why I decided to avoid the whole process and use N26.) To be safe, bring every document and piece of information you might need. That includes your NIE or TIE if you have it, your NALCAP acceptance letter, and passport.
A few notes about traditional banks
- If you don’t yet have an apartment, some people have been able to use their school’s address and then update it once they have an apartment.
- You will need a Spanish phone number to open an account.
- If the bank employee says you need to have your physical TIE card and you don’t have it yet, just try another bank.
- Some banks will say you need to purchase insurance from them – don’t do it. Show them your acceptance letter that states you have health insurance and if they still insist, go to a different bank.
- Look for banks/accounts that do not charge fees or have monthly minimum deposits.
- If the Consellería handles your placement (check your acceptance letter to find out), you’ll need a certificate from your bank that has your NIE on it. You must submit this document to the program to get paid. Confirm with the bank before you open an account that they can provide this document to you.
Public transportation

The great thing about Spain is that public transportation is widely available and convenient. It will be less convenient if you live in a small town, but there are buses that travel between smaller towns and cities in the region.
Once you arrive, look into what bus and train passes are available. In Alicante, we have city buses (1,45 euro per ride) including an airport line, a regional bus station for longer distances, a tram that services Alicante province, and a train station to get anywhere else in Spain. I purchased a bus pass early on that you can recharge and gives you a small discount.
In what order should you do all of this?
As you probably noticed by now, all of this can be confusing and frustrating. What was especially frustrating to me was the inconsistency. You can spend a bunch of time and effort getting all the appropriate documents and then they don’t even look at half of them. Or, you think you have everything you need, but you happen to get a stickler who tells you to come back with one extra document that’s not so easy to get. Also, it seems like everything requires something that you can’t get until you do something else, and so on.
So, here’s the order I’d suggest you do all of this. Anytime you can do tasks at the same time, do that.
- Look for an apartment. This can be very time-consuming so start asap.
- Get a Spanish SIM card. You’ll need or want a Spanish phone number to communicate with landlords, make your TIE appointment, open a bank account, and more. Do this at the start of your apartment hunt.
- Make your TIE appointment. It may take some time to find a time slot, so try to make the appointment early, leaving enough time to get all the required documents. If you still don’t have what you need when the appointment comes around, you can always cancel and make a new appointment.
- Open a bank account. Do this before onboarding paperwork is due to your school around October 15th.
- Make an appointment for the certificado de empadronamiento. Do this after you’ve found an apartment and before your TIE appointment.
- Turn in your onboarding paperwork. This is typically due by October 15th (double check this as the date may change year to year).
- Go to your TIE appointment. If everything goes smoothly, you can relax now!

Working as a Language Assistant
Your work schedule
Auxiliars are assigned a mentor teacher at school. This is who will create your work schedule and the person you can go to with work-related questions. Since auxiliars work between 12 – 16 hours a week, your teacher mentor may be able to have you come in only three days a week, giving you a long weekend. But this often depends on how class scheduling works out.
The work situation is different in every school and you probably won’t know until you get there. Some schools host multiple auxiliars at a time, or you may be the only English auxiliar in the school like I was. I worked with five different English teachers, alternating classes each week.
Duties of an auxiliar
If you’ve taught in your home country, teaching English in Spain with NALCAP will be a bit different. Auxiliars only assist English teachers, not take over instruction. You’ll plan activities or games at times, but your contribution should only supplement the teacher’s curriculum. Typically, you’ll talk about any holidays or traditions from your country throughout the year. Your first classes will be an introduction where you can talk about yourself and where you’re from.
The school experience varies widely among auxiliars. A lot was asked of me in my school, so much so that at one point I had to have a discussion with my mentor teacher because I felt they were overreaching. On the other hand, multiple auxiliars said they were given very little to do at their school and were bored.
Given the inconsistency in experiences, it’s important to speak up for yourself if you feel like you could be doing more, or if you feel taken advantage of. There is an auxiliar handbook that lays out the program rules and expectations in more detail. Make sure you’ve read it before your first day and keep it on hand if you need to refer back to it.
This is the 2021-22 Language Assistants Guide, which is on this website (Valencian Community) along with other useful documents. Check your region’s official government website for updated versions and requirements.

Teaching English in Spain with NALCAP – worth it?
Overall, I’m glad I participated in NALCAP. It allowed me to live in Spain long-term, travel within Spain and beyond, learn more about Spanish culture, and meet new friends. Like any big change, it comes with its challenges, but it was worth it.
There’s so much information to share about teaching English in Spain with NALCAP that I’m sure I forgot to include some. I’ll keep updating this article periodically, so check back often. Have questions about teaching English in Spain? Leave them in the comments below and I’ll make sure to answer.
And finally, follow me on Instagram and TikTok, where I’ll be sharing more info about life and teaching English in Spain!
If you liked this, check these out:
Marbella, Spain: A Gem of the Costa del Sol
Essential Alicante, Spain: 8 Things to Do & See
6 Things to Do in Beautiful Jávea, Spain
Pin it for later:


22 Comments
This was so helpful- thank you for sharing! Do you have any more advice on sharing your region preferences? Thank you so much!